Using the File Manager – Results View
Overview
The File Manager – Results view displays a list of files currently open in the application. It provides a quick way to access files (and their steps), create overlay plots, and perform file operations (such as opening and saving). Once an experiment is started, the real time data is displayed in the Results view.
To access this panel, select Results from the File Manager pane. To expand the internal list and show the steps within the file, click [ + ] next to the file. (Click [ – ] to collapse the internal list.)
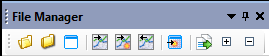
Use the right-click pop-up menu or the Results toolbar (shown below) to perform the following functions.

Back to top
Displaying Files and Steps
To display a document, double-click on a file or step within the File Manager . Alternatively, right-click on the file or step and select Display from the pop-up menu.
Back to top
Results Files Lists
Results Files List provides an easy way to recall the current list of files in the file manager for future recall. This function doesn't save the current state of the program, just the list of open files. Results files are saved with the file extension *.trfl.
The Results File Lists function can be accessed by right-clicking anywhere in the Results toolbar.
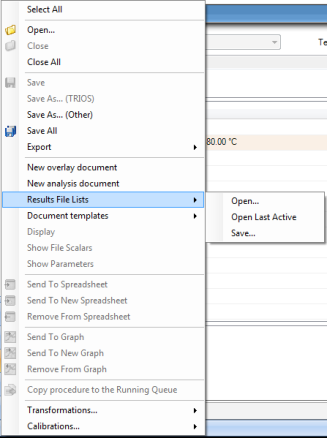
- Open...: Allows you to navigate to the desired directory location and select a saved results file list (*.trfl) to open. The files in this results file will be open in the File Manager (if they are still located in the same storage location when the Results File was created). Files will be appended to the current list of results documents in the File Manager.
- Open Last Active: Allows you open the last active file list upon restarting the TRIOS application.
- Save...: Stores the current list of files open in the TRIOS File Manager to file for future recall.
Back to Top
Understanding the File Manager Icon Indicators
Small icons are displayed next to the filenames shown in the File Manager, indicating the state of that file:
File Manager Icon Indicators
| Icon |
Description |

|
Indicates that changes have been made to the data in the document and the document has not been saved. Note that changes to presentation properties are not flagged as "changed" data. |

|
Indicates which files are displayed on the currently viewed document. |

|
Indicates a currently active experiment. |
Back to top
Performing File Operations
The File Manager Results view can be used to perform various functions when managing Result files. This section describes those operations. The common File Manager Results functions are contained within the toolbar (shown below).
Additional items are available through the pop-up menu; these options vary based upon what is selected.
For more information, see below.
Back to top
File Manager Results Functions
Select the desired file or object, and then choose a function from either the File Manager toolbar or the right-click pop-up menu. Click on the desired function in the list below for more information.
To perform file operations on one or more files:
- Select the desired file(s). To select more than one file, hold down the Shift or Ctrl keys as you select the files. You can also click Select All to select all the files currently displayed in the list.
- Select the desired action such as Save, Save As, or Close.
- NOTE: The items available in the File Manager toolbar and pop-up menu vary based on the selected object.
Available Toolbar Functions
This section describes the functions of the File Manager Results toolbar (shown below).
- Open: Opens one or more files from disk.
- Close: Closes the selected file(s).
- Display: Displays the data for the selected file, if not already shown.
- Go To Graph: Sends the selected data to the active graph
- Go To New Graph: Sends the selected data to a new graph
- Remove From Graph: Removes the selected data from the active graph
- Go to New Spreadsheet: Sends the selected step to a new spreadsheet
- Copy Procedure: Copies the procedure from the selected file to a new experiment. The new experiment sample information will be blank, and the geometry will be the current one.
- Expand: Expands all file steps in the tree for all files in the list.
- Collapse: Collapses all file steps in the tree for all files in the list.
Available Pop-up Menu Functions
This section describes the functions of the File Manager Results pop-up menu (accessed by right-clicking on a file or step).
 Select All
Used to select all of the documents listed in panel. If the file is expanded [+], only the file is highlighted (not the steps).
Menu available: Always
Open 
Used to open file(s) displaying the graph step(s) and spreadsheet step(s) associated with each file. This function displays the file open window.
Menu available: Always
Close 
Used to close the selected document(s).
Menu available: When the "main branch" is selected; not available if a step is selected.
Close All
Used to close all open document(s).
Menu available: Always
Save 
Used to save the selected document(s).
Menu available: When the "main branch" is selected; not available if a step is selected.
Save As
Used to display the file save window, allowing you to choose a specific file path and name for the selected document(s).
Menu available: When the "main branch" is selected; not available if a step is selected.
Save All 
Used to save the selected document(s). If the document has been modified, you are prompted to save changes. If multiple documents are open, the prompt occurs for each modified document.
Menu available: Always, provided at least one file is loaded.
Display
Used to open the plot and spreadsheet views for the selected document (if closed) and changes the focus to the selected document. This function can be used to open views of multiple documents (if closed). In this case, the focus will be left on the document that is highest in the file manager list.
Menu available: When the "main branch" is selected; not available if a step is selected.
Show File Scalars
Used to display the experiment file scalars, which appear as a new tab below the displayed document.
Menu available: Always
Show Parameters
Used to display the experiment parameters, which appear as a new tab below the displayed document.
Menu available: Always
Send to Spreadsheet 
Used to send the selected step data to the currently displayed spreadsheet view. This replaces the selected step data with the default spreadsheet layout for the selected procedure type. This function is valid within the same document only. Using this feature is equivalent to changing the step in the spreadsheet view with the drop-down list.
Menu available: Send to Spreadsheet is valid if there is a document with only one step selected in File Manager, the file it belongs to is currently active in the main area, and the current view is a spreadsheet.
Send to New Spreadsheet 
Used to create a new spreadsheet view for the selected step(s) data in the currently displayed document. This function uses the default spreadsheet layout for the selected procedure type.
Menu available: When a document or step(s) is selected, and the document is currently active in the main area. It is irrelevant which view is currently displayed within the document.
Remove from Spreadsheet 
Used to remove the selected step data from the currently displayed table within the same document, leaving an empty spreadsheet view.
Menu available: When a step is selected in the File Manager and that step is currently active spreadsheet view.
Send to Graph 
Use to send the selected step(s) data to the currently displayed graph. Note the following:
- If this function is selected from the "main branch," all steps in that document will be added to the displayed graph.
- Only the variables currently displayed on the active graph will be added to the graph.
- If a desired variable is currently not displayed on the graph, customize the variable display as normal once the step is added to the graph. (The variable list becomes a superset of those present amongst all steps on the graph).
Menu available: When the document(s) or individual step(s) are selected within the File Manager and the currently displayed view is a graph.
Send to New Graph 
Used to create a new graph view for the selected step(s) within the currently displayed document. Note the following:
- If this function is selected from the "main branch," all steps in that document will be added to the displayed document as a single view.
- When multiple steps or the main document is selected, all selected steps are added to one new graph.
Menu available: When the document(s) or individual step(s) are selected within the File Manager, and there is a visible document displayed. It does not matter which view is currently displayed within the active document. If all document views are closed, this option is not available.
Remove from Graph 
Used to remove the selected document(s) or step(s) from the currently displayed graph.
Menu available: When the document(s) or individual step(s) are selected within the File Manager, and the currently displayed view is a graph. (NOTE: It does not matter if the step is plotted on the graph.)
Copy procedure to new experiment 
Used to copy the selected procedure to a new experiment. Select either the document or the individual step to perform this action.
Menu available: Always
See Also
Customizing the Navigation Pane/Bar
Back to top
Navigating Between Open Results Documents
Generally, a data file is made up of the following document views:
- Experiment : Displays experimental setup.
- Spreadsheet: Displays one or more document step data in a tabular format.
- Graph: Displays one or more document step or overlay data in graphical format.
Use one of the following methods to navigate between document views within a Results file:
- Navigate between the files by clicking on the document view tabs at the bottom of the Results document.

- Right-click on one of the document view tabs to display the list of available views, and select the desired view.
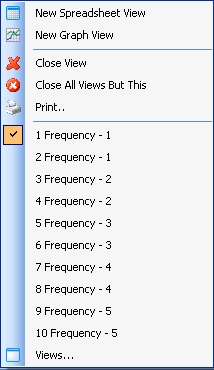
- Select one of the quick navigation buttons to display Experiment, Spreadsheet, or Graph views. If there are multiple spreadsheet or graph views, selecting the quick navigation button again toggles through the views.
Back to top
Creating Overlay Plots
Use the File Manager to create curve overlay plots. For detailed information, see Creating Overlay Plots.
Back to top
